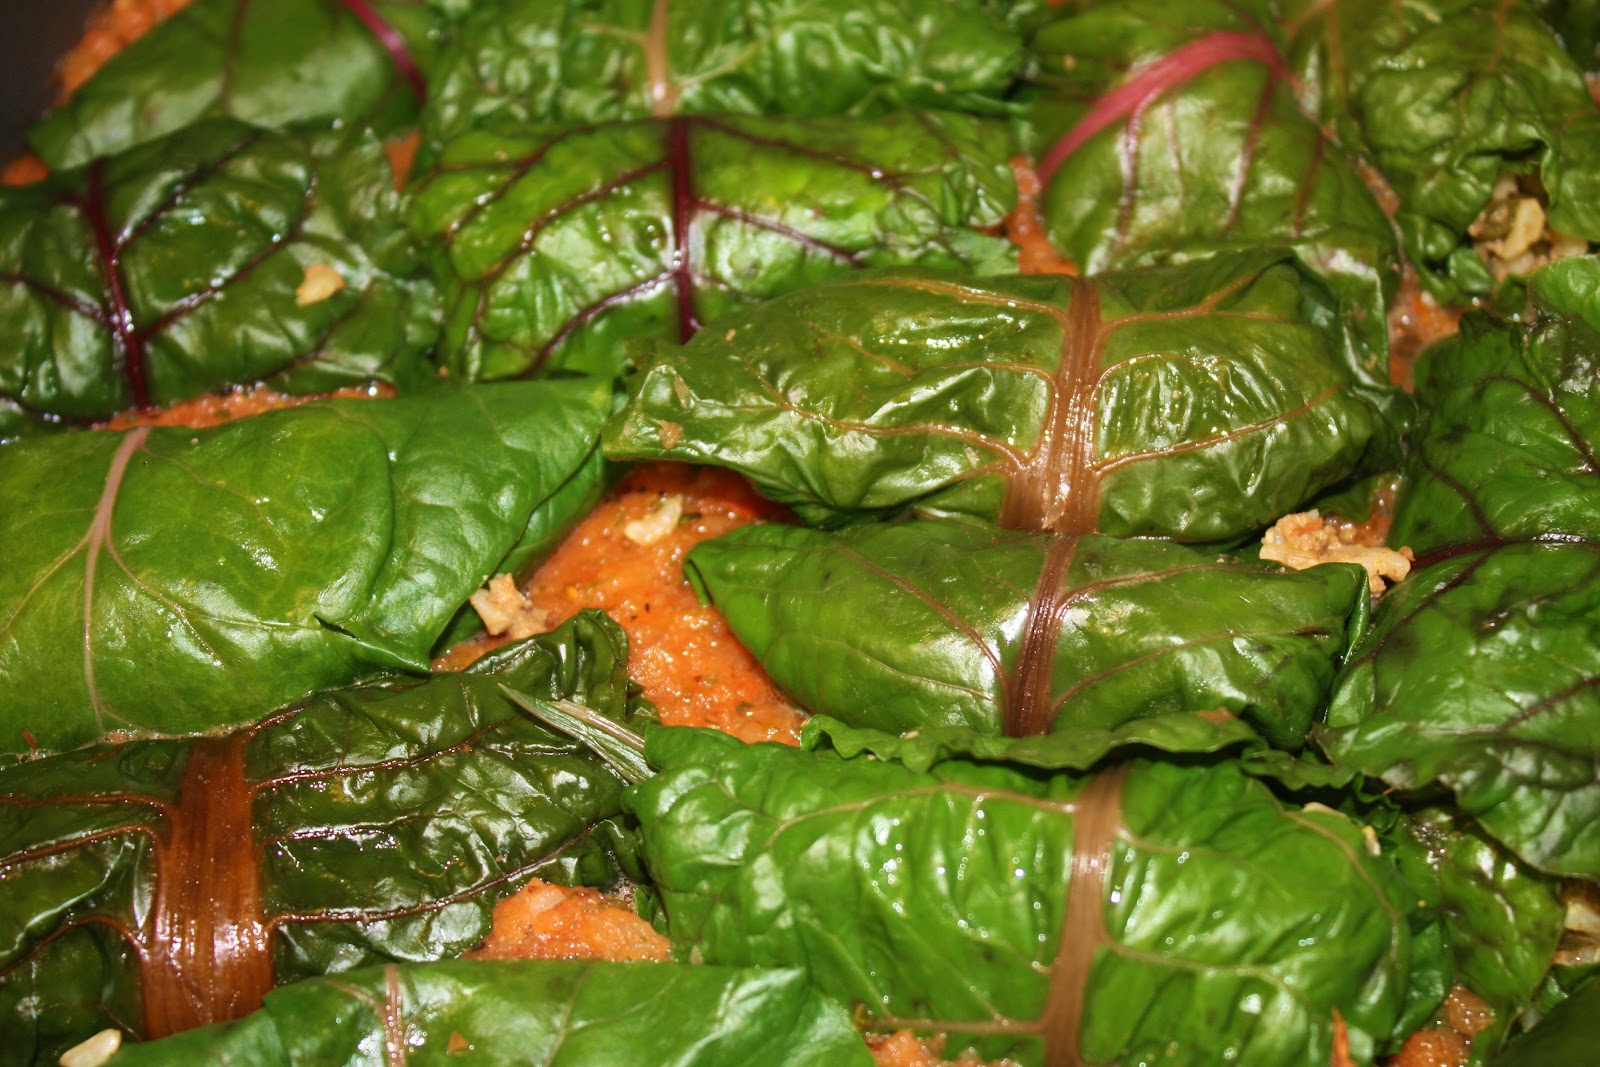
Saturday, December 24, 2011

Dock Rolls

In anticipation of the coming spring greenery, and because I haven't managed to construct a simple cold frame as of yet.... here's one of my favorite recipes for Dock leaves. What I find around Seattle is Broadleaf Dock or Rumex obtusifolius , although there are several kinds of dock plants. The plant contains tannins and oxalic acid, which are classified as slight toxins and laxative, although so do alot of other plants we eat. I blanch and then cook them, so I haven't noticed any issues. If you are sensitive to other plants with oxalic acids you might want to avoid them. Any time you forage for plants you have never eaten before, be sure you are correctly identifying the plant and try just a small amount the first time. Learning from an experienced local is always a good idea. That said, like most greens of spring, dock is also known as a liver tonic.


Dock Rolls

@ 16 medium to large broadleaf dock leaves
3 tbsp olive oil
1 lb. ground turkey or lamb
2 cups of water
1 onion, diced
1 cup of rice
2 tsp. pumpkin pie spice
pinch of salt
2 tsp. each of ground cumin and ground coriander
2 tsp. chopped parsley
1/4 cup raisins
1/4 cup chopped nuts of choice, you could use almonds, walnuts, pine nuts, hazelnuts
2 cloves of garlic minced
optional, parmesan cheese

Sauce
15 oz jar tomato sauce 
1 clove garlic, minced
2 tsp. ground cumin
2 tsp. ground coriander
salt and pepper to taste

In medium saucepan bring to a boil meat, onion, garlic and spices. Take off heat and let sit for @ 10 minutes, then drain reserving 1/2 cup and save the rest for another purpose. (makes a nice base for a soup stock, for instance). Put strained meat and onions into a large bowl and add rice, salt, raisins, parsley, and nuts. Mix.

Pre-heat oven to 350*

In a medium pan bring some water to a simmer. In batches, dip the dock leaves for a few seconds each and then rinse with cold water in a colander. This step is a pain, but it seals the nice bright green color in the leaves so they don't turn brown in the baking dish. This is true whenever you want your greens to stay a nice bright green. Drain the leaves. Lay a leaf on a plate and put a couple of spoonfuls in the middle of the leaf; fold in the sides slightly and roll up. Place each one as finished with the rolled edge down, in a baking dish, 9 x 13" . I have also done this in a large skillet with a fitted lid at low heat.Mix together all ingredients for the sauce and add reserved juice from meat.  Once all the rolls are in the dish top with the sauce. Cover dish with foil and bake for about 35 minutes. Dish should be bubbling. If desired, top with parmesan or other cheese and bake uncovered for another 5 minutes. Enjoy.


Thursday, December 22, 2011

Preserved Lemons

Yay! It's that time of the year..... time to preserve lemons. I love preserved lemons. They are a great way to put up your surplus or put aside lemons for the year while they're in season and a lower price. I like Meyer lemons, but any variety will work the same way. You only need two ingredients, lemons and salt, but traditionally, herbs and spices would be added for a more complex flavor. I like fennel seed and bay leaf, which are fairly traditional, and both of which can be found growing in the Pacific NW. For my container, I can fit 7 lemons, which will last me pretty much till next year depending how much I use them in cooking.

7 lemons
@ 1/2 cup of pickling or sea salt

I don't measure, so 1/2 cup is an estimate. You can't use table salt for this because it's not a pure salt product; it's like salt food product, highly processed with additives. It must be "pickling" salt or sea salt that is not highly processed, think Celtic sea salt.

Wash lemons and cut through as if in quarters, but leave far end intact. If there is a piece of green stem, trim it off. Sprinkle a little salt, and spices, if using in bottom of container. I have a mason type jar that is missing the rubber seal, so it allows air to leave. You can use a fermentation jar, but close loosely so there is a small amount of air flow. Cut the lemons as described and squeeze juice gently into jar without breaking lemon into pieces. I remove as much seeds as possible at this point because they are inedible, but without breaking apart the lemons. Leave any that are too hard to remove. Place lemons in jar, sprinkling some salt inside of each lemon as you go. After first layer in jar, sprinkle some more salt. Continue till all lemons are in jar. Sprinkle more salt on top and press lemons down into jar with wooden spoon until the juice is covering them. Close container and set aside for 3-4 days, and after that, refrigerate and enjoy! Fruity sunshine in winter.


Wednesday, December 14, 2011

Beautiful Skies

Yesterday was a day of completeness. Both sunrise and sunset were magically delicious. This is what greeted me as I went out the door in the morning:


And this is how the day waved goodbye; the sun is an awesome star even when its' light only reaches me indirectly:


Friday, December 2, 2011

Tea Eggs

I'm sure every other foodie out there has already tried their hands at these, but this is my first try.


Tea eggs are boiled eggs, that are then cracked all over with the back of a spoon; but leaving the shell as intact as possible. The eggs are then simmered for quite some time in a tea bath with other spices and herbs. I decided to skip soy sauce, being gluten free, but you'll want to add a salt source; black tea, orange peel,and star anise. 


I read wildly varying amounts of time for simmering the eggs, from 40 minutes to 5 hours. I went with about two hours and I would try a longer time or more concentrated bath. Still they were really tasty with a subtle hint of all the flavors. The sauce seeps through the cracks to flavor the eggs and leaves pretty designs, which can be much darker than what I did.


I'll be trying this again, with other spice combinations, like Madrone bark, as suggested in a blog my friend Nina posted, from Hunter, Gardner, Angler, Cook 

Thursday, November 24, 2011

Happy Thanksgiving!

Hope you are all having lots of food and good times. 


I got roped into making a very different recipe by my bf, who wanted a garlic onion pie. He did help make it. I said, a tart? No, a pie, a dessert. No dairy. Hmnn. Well, I put together a recipe using coconut milk, and it was fairly tasty in an odd sort of way. It hasn't aged well, and he won't eat any, so I think the rest of it will end up on the compost pile. He says next time, he'd rather try for something quiche-like. Luckily I had also made a regular pumpkin pie.


Sunday, November 13, 2011

Corn Dolly

A corn dolly. I knew I wanted to make one of these when I was growing my corn, but I didn't imagine how beautiful these corn husks would be.

She is the embodiment of my own personal Fae, an assignment I was given by Shannon of Herstory , during a reading from Brian Froud's deck, in which she pulled a blank card as the space to create our own personal Fae. Intuitively, I'm tying this in with the Queen of Cups tarot card, which is my personal court card. She's usually depicted as quite domestic, but she has her wild side, as she's the human embodiment of Gaia, nurturing and abundant, but like her helper Calypso, doling out some storms when the air needs to be cleared. My dolly fae is made of Indian corn, half domesticated, half wild, bringing the best of both ways, knowing the benefit of a warm hearth and cultivatable nourishment, while retaining her wild strength, vigor and beauty.

I've saved the rest of the husks (Ok, I just had a tiny circle of corn) to use in my second attempt at natural dyes. The color of the husks is so pretty, I hope it will stay in the yarn, unlike the blackberry fiasco. The color was so pretty at first, with the blackberries, but just washed most of the way out; which led to a 2nd attempt with a different mordant, giving me a mottled, dull medium brown, my least fave color in the world. Which lead to more overdying attempts using hibiscus tea, roses and lavendar with salt, which was a slightly warmer color of still ugly brown..... which lead to my final desperate attempt to make this yarn something I would ever use, by overdying with red food color, the little bottles from the spice aisle. It's a prettier mottled brown with bright red tones that I'm going to use for my first sock knitting class next week at the Yarn Stash . I'll post some pics when they're done.


For an alternative image of the Queen of Cups, check out my friend Magi's Tarot of the Pomegranate


Monday, November 7, 2011

Other colors of mountain ash

I took a guided plant tour at the Arboretum last weekend and came across varieties of Mountain Ash that were white and pink. Anyone know if they are also edible?

Friday, October 28, 2011

I've been posting so much about food lately, I decided to share some other projects. Here are some crochet projects I've done lately; a hat and a necklace. I was very happy with the hat; I'm going to experiment more with this type of necklace to find the best combo of yarns structurally as well visually.

The super-popular this year, mohawk hat, on my friend Bubha John. I got the free pattern on Ravelry , thanks, Hannah, although I crochet the same way I cook, because this is a knitted pattern that I managed to adapt.

and

the Crochet Necklace
The weather is cooling. Time for winter soups. The soup I'm posting today is a great way to use leftover parts of veggies that might otherwise get tossed. I grew some dent corn this summer; in Seattle, can you believe it? I got it from a local supplier, Uprising Seeds,  a 100% organic seed company,and was pleasantly surprised to find that it not only grew well, but didn't get all the buggy pests I fought with in the South. In this recipe, I have removed the kernals from the cobs for other recipes and am boiling the cobs in the stock which gives the soup a pleasingly light corn flavor. The other second use ingredient is fennel. Fennel bulbs are yummy, but it's a shame to throw away the stalks and fronds, and so this is how I made use of them. This is a veloute style soup. It has only a few ingredients, but takes a bit of time to make.

Sadly, we devoured the soup before I thought to take a photo, so I appropriated a photo of corn and fennel from a fellow blogger, the Vegetarian Chickie, because there must be some sort of photo on a post; but now I feel guilty using someone else's photo, so go check out her fennel and corn recipe! It lookes pretty yummy. You get two recipes for the price of one.

This is my recipe for Fennel, Corn and Fish Soup:

8 cups of broth, I used turkey
2 corncobs, cut in two, so they will fit into the pot
stalks of 1 head of fennel chopped into 1" chunks
1 large potato, 2 would make a thicker soup, cut into chunks
10 oz. salmon, cut into cubes, or flavorful fish of choice
1/4 cup fennel fronds, finely chopped
2 cups greens, I used assorted weeds from the yard, nutritious


First I simmered the corn cobs in the broth for a couple of hours. I suppose this could be done in a slow cooker, but I did it on the stove with a lid, so the liquid doesn't evaporate too much. Once the cobs had a bit of a tranlucent look, I fished them out and they went to the compost pile. Next I added the fennel stalks and simmered for about another hour, I left the bigger chunks which had softened up, but fished out the thinner tougher bits as they stay pretty tough, but have left their flavor. Add the potato, and simmer until just tender. Add the chopped greens and leave for about 3 more minutes. Remove the soup from the heat and allow to cool some before putting in the blender. Return the soup to the pot and reheat to a simmer, adding the fish. When the fish is looking done, add chopped fennel fronds.

Some possible additions for serving might be a dollop of sour cream or yogurt, or a pesto. For vegans, you could possibly use vegetable broth and tempeh instead of fish, but I think it will be a blander soup, you might want to add some carrots or corn kernals for more flavor. I personally never follow a recipe to the letter, experiment.

Enjoy!
 Let me know if you liked it.

Tuesday, October 4, 2011

September, for me, was blackberry month. Blackberries were late coming this year and then they hung around for a long time. yippee!

I made a full size batch of blackberry wine which is in the carboy fermenting. Last year I only got to make a small batch, so that was first on my list this year.

I also made a small batch of blackberry mead, using a recipe from First Ways blog, which is an excellent blog with photos and step by step instructions.

I also made a pie, of course, but having already done pies and jams during salmonberry and raspberry season, I was looking for some variety. I made a blackberry chutney, that tasted alot like cranberry sauce; so I froze some for Thanksgiving. Made a recipe from Martha Stewart for blackberry/red wine jello.
A blackberry cheesecake.

By then I'd had about as much sugar as I could swallow, I don't have a huge sweet tooth, so I tried some less sweet ideas. Blackberries added to oatmeal. Blackberries added to my kombucha (shown next to the raspberry kombucha made last month)

I re-use glass jars cause I don't like to use plastic.

Blackberry kefir smoothie; which did have some honey.

And then I decided to try some non-food ideas.
Blackberry ink, which is the juice with some salt to preserve it. I'll post some pics once I get creative with it.

And finally, I'm trying out using it as a dye, although the sites I found said that the color will wash out and brown out with washing and light exposure, but it seemed like a shame not to try to capture some of that gorgeous color!

After all that, I still have a couple of containers of berries frozen for deep winter when I will crave a warm pie.

I understand why people don't like the blackberry vines here, as they are very invasive, grow fast and the thorns are not fun. The Blackberry Goddess demands payment in blood! The berries are wonderful, though.
So far, I don't have much competition in picking them; all this was from a half block area at the end of my street. I noticed the hazelnut bushes after the season had passed by a couple of weeks, next year I'll have my eye out for those, too. You can never have too much free food!


Tuesday, September 27, 2011


Mabon


Fall and Winter are a natural time of year to move from the Outer World to the Inner World. As the Earth shifts and we spend more time in darkness, we have time to spend in reflection. We shift to artificial light, an imitation of the Sun's light; but artificial light can go where the sun can't shine. Time to look at what lies beneath, when the World lies in Shadow and that which is hidden is revealed.

 What will we find in the basement of our Being? Do you dare to look? We fear looking at the hungry ghosts and howling monsters; but if we hide they come to find us, draining the light from our lives. If we dare to shine the light upon them, we often see that the shadows make them seem larger than they are. When illuminated, it is only a spider or a mouse; we either sweep them away or learn how to coexist with them or whatever action is most appropriate.

 Like the leaves of Fall that spend the Winter in decay; being transformed to nourish the seeds of the new Spring when the Sun returns; we, too, can complete this alchemy within to transform our demons, ghouls and bad habits into fertile ground for growth in the garden of our Souls.

 In Nature, the catalyzing ingredients for this alchemy are the fungi and bacteria that work to digest and break down organic matter. In our Beings, the catalyzing ingredient is our Will to shine the light of Consciousness on our own dark and stuck energies to absorb/accept, break down and integrate them into our Lives. This work can be done at any time of the year, but I find it more potent to work with the natural energies and seasons of the Earth.

Monday, August 22, 2011

What do you do with watermelon Rinds?

Recently I got one of those personal size watermelons, organic, of course, and had plans to make watermelon rind pickles with the non-red part of the fruit. Much to my diasappointment, the rinds were quite thin, so the pickles were out of the question. There WAS a thin rind to the watermelon, however, so I decided to make SOMETHING out of it. After much searching online, I saw some other recipes besides pickles, one of which was relish. I decided to try it, but make it a lacto fermented relish and changed some of the ingredients. It came out fabulous!

This is how I made it: I peeled the green exterior off of the rinds and chopped them into 1 " or so squares.
 Next I pureed the rinds in a food processor, till they were a little chunky, but pretty mushy.
Next, I pureed the rest of the ingredients, except for the whey, in the food processor. The recipe is below. I mixed the watermelon, other ingredients and the whey together into a large glass jar and let ferment for 3 days, after which it is stored in the fridge. My bf couldn't believe this tasty relish was made with watermelon rinds!
My boyfriend likes peanut butter; I like the glass jars. I make him buy the big ones. I don't like plastic containers with their BPA and dioxins if you freeze or heat them, I do not like them one little bit.


Recipe:

3 1/2 cups water melon rind, peeled and chopped into @ 1" pieces
1/2 red pepper
1 medium onion
1/4 raisins
2 tbsp. sea salt
1 clove garlic
1 tsp. mustard seed
1 tsp. turmeric
1 small hot pepper (optional)
4 tbsp. whey

Thursday, August 4, 2011

Rose Coconut Chicken

This chicken recipe was inspired by a hot chocolate I had in Asheville, NC. It actually doesn't taste like it at all, but that's where I got the idea for the ingredients. Don't be put off by the idea of roses in your chicken! The rose and coconut gives the chicken a sweet flavor without much of a rose taste, although I love the taste of roses, personally. For best results, use a free-range, organic chicken that is fresh, so that you can marinate it for a couple days in the sauce. When you're ready to cook the chicken, save the marinade sauce to make rice with, substituting it for the water. Delish.

Rose Coconut Chicken

1 cup chopped rose petals
1 whole free-range, organic chicken cut into parts
1 cup hot water
3 cardamom pods, crushed
1 tsp. fennel seeds, crushed
dash salt
1 can coconut milk
1/4 cup fresh whey or yoghurt
1/2 cup chopped pistachios

Soak the rose petals in the hot water for a few minutes to steep. Pour into baking dish or other container to marinate. Add chicken. I use either a coffee grinder or mortar and pestle to grind the spices, then add to dish. Add salt and coconut milk and whey or yoghurt. Mix all ingredients together well; I poke the chicken in several places with a knife, so that the marinade seeps in. Cover and marinate in the refrigerator for a couple days. When you're ready to cook it, drain off the marinade, saving it to use to cook rice. Sprinkle chopped pistachios on top and cook chicken in 350* oven for about an hour, check that chicken has cooked through, or for more tender chicken, if you have the time, cook at 275* for 2 to 3 hours or until done.


Monday, July 25, 2011

Using mushrooms for dyeing and pigments

Last weekend I went to a fabulous workshop on dyeing with mushrooms, hosted by the Puget Sound Mycological Society. We used wool yarn to make swatches of dyes obtained from various local mushrooms and with different types of mordants to get a taste for the creative possiblities mushrooms offer. My favorite was a bright pink made from rotten Lobster mushrooms and using washing soda as a mordant, although the bright yellow from wolf lichen was a close second. Lichens will actually dye without use of a mordant. Apparently, so much lichen was being collected in Ireland for dyeing wool that they have to restrict its use. Lichens have been used historically for dyeing textiles, but the use of mushrooms is quite modern. Modern mushroom dyes were by and large introduced by Miriam C. Rice, an artist who began developing the use of mushroom dyes in the early 70's. She went on to teach workshops and write very instructive books on the subject.
She worked in a close business relationship with illustrator Dorothy Beebee who has carried on her work. She also developed pigment for paint sticks and papers made from mushrooms.

Dyeing is a passion in any place that people keep sheep for making their fleece into yarn, and into clothing, bags and all sorts of other useful and decorative items. I was surprised to learn that there are still still many enthusiasts of the handmade. There are huge international conferences for textiles made from or dyed with fungi.

I saw so many creative uses for the dyed fibers at the workshop yesterday that I can't wait to experiment at home! It is recommended to heat the dye baths outside as some mushrooms are toxic and manipulating them for use can release the spores, so it's better to be in a well ventilated area. Also, they said they can be quite stinky and not well tolerated by the less creative members of the household.

lobster mushrooms

Wednesday, July 13, 2011

My first home made mustard!

I've been wanting to make my own mustard from scratch for awhile now and I finally tried it. I'm glad I waited because I've only learned about lacto-fermentation just recently. I decided to make the more rustic, grainy style mustard; so I used two kinds of mustard seed: white mustard and black.

I let them soak for 3 days in a jar with whey from kefir, a bit of water and some raw sliced onion. (1 cup mustard seeds, 1/4 cup whey, and enough water to cover the seeds) The longer you soak it the spicier it gets, so after 3 days, it has quite a bite! You can add all sorts of flavorings to the mustard, I picked the onion because it sounded intriguing; it gave the mustard a slight musty taste that gave it depth..... I like it!

 Once soaked for the appropriate time, throw it into a food processor. Add a little turmeric to get that yellow color, and also turmeric has anti-inflammatory properties. Maybe a bit of sea salt, and a bit of cider vinegar if you feel it needs more liquid.

 And Voila! Home made mustard! Yum!

Monday, July 4, 2011

more recipes at Hunger and Thirst's blog

Some of my stinging nettle recipes can be found this month at Hunger and Thirst 's blog. A dynamic duo of bloggers sets a challenge using a wild foraged ingredient each month and at the end of the month, the Wild Roundup is published with all the recipes everyone has sent in. There were @ 30 recipes this month! It's a great way to learn about wild edibles and their uses.


Saturday, July 2, 2011

2nd try at Salt of the Earth

Hi......... I had this post all done, and before I could hit publish, the internet ate it.......... so....... we'll give this another try.

Recently, the boyfriend and I and an old friend from FL, met up in Portland and went to the Colombia River Gorge scenic area to see more waterfalls than you can imagine in a couple mile area.
 Fantastical, dreamworld forests and waterfalls. The bf and I stayed overnight at the Bridal Veil Lodge, which was an old-time lodge with really cute, clean and comfortable cottage rooms, that had skylights, so you could see the stars at night.... well, if it hadn't been cloudy. I highly recommend the place, the owners are very knowledgeable about the area, friendly, and best of all, I could actually eat the breakfast for once, because they cater to food allergies! Just let them know your requirements the night before, and you'll get a yummy gourmet breakfast you can eat!

The second part of this trip for me was going to the amazing salt store in Portland, The Meadow; where you can buy the salt of the Earth, literally. They have fine salts from all over the world. Real salt. Did you know that typical table salt from the supermarket is a highly processed food? First, it is baked at high temperatures to crystallize it, which kills all the minerals and iodine. Then they add an industrial grade iodine back into it, but that turns it purple so they bleach it. Then they add dextrose to make it taste right again. None of that is on the label, because it's considered part of the processing rather than an ingredient. This is good to know if you have blood sugar problems. The body doesn't recognize this altered salt product, so you can actually be low in blood sodium, while messing up your blood sugar. I just want real salt, please, with the minerals and iodine naturally still in it. Anyway, back to the store, they are VERY friendly and will spend vast amounts of time explaining the salts; what different salts from different parts of the world are best at flavoring, and the difference between fleur de sel, and sel gris..... they have testers of each salt so you can try them out. The store also carries specialty chocolates and gourmet bitters. The bf was most patient while I took an hour to figure which salts I wanted......... it was like being in a candy store.

Monday, June 20, 2011

Plasto the recipe

I decided to go ahead and post the recipe, as I thought it would be less confusing than inserting my gluten-free substitutions over the recipe on another web page. This recipe was inspired by Laura Constantino, who was in turn inspired by a recipe from a Greek Church. This is probably my all time fave nettle recipe, altho it's tasty to have a mixture of greens, say nettle and dock, or nettle and kale, last night I added in some parsley, whatever greens you have foraged or have on hand...... chard.........

makes about 6 servings

filling:
4 well-packed cups of greens (remember greens shrink alot with cooking)
1 chopped onion
1/4 cup olive oil, butter or lard rendered from a pastured animal
dash of salt
1 tsp. hot pepper (optional)
1/2 cup fresh dill, minced or @ 2 tbsp. dried depending how much you like dill
couple sprigs of mint, minced
1 cup kefir or yogurt

cornbread:
1 cup yellow cornmeal
1/2 cup sorghum flour
1/2 cup brown rice flour
2 tsp baking powder
1/2 tsp baking soda
1 cup plain yogurt or kefir
1/2 cup other liquid, I use whey left from my kefir, or almond milk or even water
2 eggs, whisked
3 tbs. melted butter, I use goat butter, could also be olive oil

Preheat oven to 400*. Grease 10x10 pan .

Make filling: wash greens. Discard and tough stems, or save for another use. Bring a large pot of water to boil, and blanch greens for a couple minutes. Drain and rinse with cold water. Squeeze out as much water as you can and chop. We don't want soggy bread! Put greens in a bowl.
Sautee the onion in the oil/butter over medium heat until onions are softened; stir in pepper.
Mix together chopped greens, sauteed onions, dill, mint and yogurt/ kefir; season to taste with salt.

Cornbread: Mix all dry ingredients together. Whisk together eggs, yogurt/kefir and liquid until all ingredients are blended. Melt butter or add oil. Stir egg mixture into dry ingredients until they're almost completely mixed. Stir in butter/ oil.

Spread a little less than half the cornbread mixture over the bottom of the buttered pan. Spread filling over cornbread mixture. Pour the remaining cornbread mixture ove the filling and spread to cover. Bake for @ 40 minutes, until crust is golden and filling can be seen bubbling from the sides.

Let it rest @ 10 minutes before serving. It's actually really good cold and makes an excellent picnic, foraging snack!

Sunday, June 12, 2011

seaweed foraging

Last Saturday, we finally had a beautiful sunny day here in Seattle. It was a perfect day for a talk on wild seaweed foraging, led by Melany of Essential Bread. It was a fun and informative talk at a local park, probably not a good place to forage on a regular basis due to urban pollution; the park was packed that day! But there was alot of life in the water. To harvest seaweed in WA, you will need a Shellfish/ Seaweed license, but they're not expensive and you can get one at Fred Meyer's or other outdoor recreational stores. As always, it's good to learn from someone local that knows what they're doing before putting anything in your mouth! The best time to forage is at low tide when the shallow water offers up her bounty. Check on the government site for regulations and resources: http://wdfw.wa.gov/fishing/regulations/  Western WA has alot of wild edibles, so it's a good thing to learn to recognize what's edible. Here are some photos:
Irridescent Seaweed

Turkish Towel

ok, the starfish is not edible as far as I know, but it was pretty.

I did harvest a bit of seaweed to try out, although I'll look for a place a little further away from the megatropolis for future harvests. I wanted to try out some of the examples we looked at. yum.

Sunday, May 29, 2011

first harvest from my little garden!

I've picked a few odds and ends, but this is the first full salad I've harvested from this year's garden. I used a couple of things like garlic chive flowers, some of the pak choi which wanted to go to seed instead of making heads, and the shallot seed pods to make a veggie tempura, along with the salad. Yum!

Wednesday, May 18, 2011

Gaia dressed up

Today is beautiful, finally! Sunny and warm, so I decided to go out and capture some of Gaia's finery on camera....


Monday, April 25, 2011

Plasto!

I seem to be obssessed with food at the moment. I found a new blogger from Alaska that uses wild foods. I tried her Plasto recipe last night and couldn't stop eating it! Of course I changed it to a gluten-free recipe, substituting the cup of flour with 1/2 cup sorghum flour and 1/2 cup brown rice flour, and instead of the cheese I used a cup of kefir, cause that's what I had on hand.... yum! I used nettles and kale for the greens, you could just use any store bought greens, the closest to the nettles would be spinach.
Laurie Constantino is the chef, she lives in Alaska and Greece and her foods are a combo of the two cultures .......

Sunday, April 24, 2011

Mayan Cuisine

Been working my way thru this book, got it from the library, but I'll have to break down and buy it. Every recipe I've made so far has been fabulous.... and I've made 6 or 7 at this point. The library is a great resource to try out a book to see if it's a keeper. I love authentic Mexican/Mayan food, there's not much cheese involved, it's actually very healthy and well-balanced, making the food from scratch.

Thursday, April 21, 2011

Spring Cake by the Dyhanaverse

Here's the Spring Cake recipe I developed for Cauldrons and Crockpots plant of the month challenge, Dandelions. It uses dandelion roots. Dandelions are one of the first greens in the spring and quite nutritious, like many of the early spring greens it is a tonic, cleans the blood and liver and all parts of the plant are edible. The only contraindications I've seen is to not eat too many of them or concentrate them if you have kidney problems, are using diurectics, or are diabetic, but the amount I'm using here shouldn't be a problem. Dandelions tend to be a bit of a diurectic and are considered anti-diabetic. It seems like it would be a good replacement for these medications without the side effects, but doctors love their pills, so don't do any self- medicating or take pills for these conditions and also consume alot of dandelions. If you have severe kidney problems (or are going to serve it to someone who does) check with a doctor first. If you are lucky maybe you can find a doctor that starts with natural remedies first. I however, am not a doctor and am only promoting use of the plant for cooking.  Did you know that dandelions are not native to the Americas? They were brought over, along with stinging nettles by the early settlers because of their nutritive and medicinal qualities. Be sure to use roots that are from an area that is not sprayed and not too close to a road. Now instead of putting chemicals in your yard to get rid of them, just eat them!


 recipe is for a 9" square cake pan

ingredients:

1 cup tapioca starch
1 cup hazelnuts, roasted and then ground in food processor
1 cup almond meal
1 1/2 tsp. baking powder
1/2 tsp. baking soda
1/2 tsp. seasalt
1 tsp. cream of tartar
1 cup maple syrup
1 cup almond milk
2 free range organic eggs
1/2 cup oil of choice
2 tsp. vanilla
 @ 3 tbsp. chopped roasted dandelion root

In medium mixing bowl, whisk together all dry ingredients except dandelion root. In a small saucepan, bring the almond milk and dandelion root to a boil; turn off and let steep for about 10 minutes, then strain the roots out. Hand beat the eggs in a medium mixing bowl, add the almond milk and the rest of the wet ingredients, mixing well with a fork. Add the wet ingredients to the dry ones, mixing well with a fork. Batter should be very wet, like a pancake batter, but chunkier; not thick like cake. The tapioca will expand during cooking, so you don't want it too dry, it should pour off a spoon easily, add more almond milk if needed. Grease pan, I used coconut oil, but any oil will do. Bake in oven at 350* for about 40 minutes. It's done when an inserted butter knife comes out clean.

Eat while still warm, yum!

Rhubarb-Strawberry Pie

ok, I'm back, minor family emergency slowed me down a couple of days. I realized that things had normalized last night when making dinner... even with the bf doing some dishes as we went, it looked like two bombs had gone off in the kitchen. This morning it's down to 1/2 a bomb. Since I'm late with the promised recipe, I'll give you a twofer, the second recipe will be posted separately. Plus I need to write down last night's dessert before I forget what I put in there. My short term memory, not so great, well, that and the couple glasses of wine I was having at the time, ...... when I get happy I tend to stop using measuring implements, so I'll have to guess a bit..... I started putting organic next to the ingredients list, but I would add that to ALL the ingredients, personally, so I'm just making a note of it here. If you don't usually use all organic ingredients, I would strongly suggest to at least use organic strawberries (one of the most heavily dosed crops we eat) and the orange peel, since a majority of the pesticides in oranges are absorbed by the peel. Oh, and I hope you will use organic sugar, because the commercial sugar farms' runoff tends to end up in the Everglades, which is struggling to survive. Thanks... Be healthy!

Strawberry-Rhubarb Pie

recipe is for a 10" round pie

ingredients:

3 1/2 cups of rhubarb, chopped into small pieces
2 cups of strawberries, chopped
3 tbsp. tapioca starch
1/2 tsp. grated orange peel (organic, the pesticides are in the peel) I used meyer lemon peel, because I buy organic and figure for the price I may as well zest the peel and use it, too. I'm big on finding every possible use for the food I buy
1 1/2 cups sugar
2 ground cardamom pods or a dash of ground cardamom
dash of sea salt
1 tbsp. orange juice
your fave pie crust, you can either make this an open face pie or put a second crust on the top and make some cut aways to vent, I used a crumble type crust for the bottom and the top

In a mixing bowl, use a spoon to thoroughly mix together all the ingredients (except the crust, of course). Heat oven to 350* and bake bottom crust till just browned. Pull out of the oven and add filling. Add top crust if using. Place in oven for about an hour, cooking time will depend on your oven and elevation, so check on it occassionally. When the filling is bubbly and the crust is browning, it's done.
 I didn't need to put foil over it with my crumble topping, but you may want to cover it for half the baking time if using a conventional crust, so that it doesn't burn. Let the pie cool for a bit, like half an hour so that the filling can settle, and then eat while still warm.

We ate pretty much the whole pie the first night!

Sunday, April 17, 2011

Nick Cave show

No, not THAT Nick Cave, the other one; my new fave artist. Catch his show at SAM Seattle or wherever he takes his show near you. I love how fiber arts are taking a fine art direction. I totally want to make a costume like this for BM this year, so whimsical, so colorful. Great use of found objects (I admit to being a dumpster diver for art materials, it's genetic, but I'm kinda proud of it now) Amazing integration of cultures and imagery. He's the black dude in alot of the photos and videos, uh, he's pretty hot! He's also a very prolific artist; most of those pieces looked like they took some intensive time to make, and there were alot of them; although it looks like his students help out. He's also a pretty slick marketer; had his own little gift shop within his individual space at the museum. One of the better exhibits I've been to in a long time, highly recommended.

Monday, April 11, 2011

It occured to me.....

last night as I was sitting and eating brown rice penne with vegetables and dandelion bud capers, drinking home brewed ginger ale and waiting for a homemade gluten-free strawberry rhubarb pie with cardamom to come out of the oven, that I may have crossed the line to becoming a "foodie" . Is that a good thing? My bf seems to enjoy it!
I got the recipe for the dandelion bud capers from one of my new fave blogs: Hunger and Thirst , she blogs together with a friend who an be found at: Cauldrons and Crockpots
I'll post my recipe for the strawberry rhubarb pie tomorrow and I'm working out an original recipe featuring dandelions for these gals' April challenge, which is, of course food with dandelions!

Tuesday, April 5, 2011

Creating Spring

If you're like me, you're ready for Spring to be sprung already! I decided to get the party started and create some cute spring giveaways in the process. This is a tried and true spring project; I gave it a little twist by adding some spring -themed sticky jewels that I picked up at the craft store. It's a great re-use for eggshells. Fill the shell with some potting soil and put in a seed or two of a fast-sprouting, cool weather plant; I used Calendula which for me has sprouted in less than a week and can be planted out as soon as it gets a couple of true leaves. I then put it in a window that gets light most of the day (I would love to say sun, but I haven't seen that for some time now) actually, there must have been a bit when I took this photo.... I'm sure it was an aberrant moment. So far, those I have given as gifts were met with smiles :) 

Monday, March 28, 2011

new upcycled shawl finished

This upcycled shawl depicts Saraswati, the fave goddess of my wonderful life coach, India. She was so excited to finally receive it! (The scrollwork applique took some time) It also has the chakras arranged vertically on the figure. I used pieces from some of my most treasured fabrics to make this image, fine antique lace and silks.  It is so beautiful, I wished I could keep it for myself; but I was so happy to give it to her when I saw how much she loved it too! 

Friday, March 18, 2011

 Hi, all, I've decided to post directions for the scarf below, so I can post it on my Ravelry account. Happy crochet-ing!

Boyfriend Scarf by Dyhana
Instructions:
Materials: One skein of sport weight yarn
Hook: I used an "G"
I noticed that the sport weight yarn had a tendency to fold over in the finished scarf; try a thicker yarn with a larger hook size if you want a more substantial scarf.

I cast on 80 st, this allowed the scarf to loop around once nicely, add more if you want a longer scarf. Turn, (Row 1,sl st all the way across, turn, Row 2, ch 1, sc all the way across, turn, Row 3, ch 2, hdc all the way across, turn) Repeat Rows 1-3 until you have the width you desire, turn, sl st across one more time to create matching edge to first edge. Bind Off.

Give to grateful boyfriend (or whoever :)

Saturday, March 12, 2011

Exuberant crochet guys in West Seattle!

These two crochet designers, known as the Shibaguyz, found me on Ravelry. Have you checked out Ravelry.com ? It's the online knitting/ crochet universe or would that make it the webiverse? These guys are full of ideas and energy. They offer their designs and expertise at the Seattle Yarn shop on Thursday nights and online anytime. Links below. This is what they're up to at the moment:

Week #2 brings the challenge to unite the crochet world by changing the name of National Crochet Month to INTERNATIONAL Crochet Month!

We’re going to spread the word that we are an international community celebrating the crochet. Tweet about it, post about it, sing about it, dance about it, Facebook about it, blog about it, paint, sketch, draw, or make a cake about it. Whatever leads your heart to joy… use it to declare we are now celebrating International Crochet Month!


http://www.ravelry.com/groups/shibaguyz-designz-fanz
http://www.seattleyarn.com/
 
..... and yes, someone made them a cake!

Wednesday, March 2, 2011

Valentine's Day scarf

I made this scarf for my bf using 3 simple crochet stitches. I had to keep it simple because he wouldn't wear anything that looks "girly". I still wanted it to have some style. I made this over a weekend while we were in Florida and it was 80*, lol, but back here in Seattle.... he's been wearing it.

Tuesday, March 1, 2011

tomorrow night at Skinny Dip

I'll be performing tomorrow night with my friend Magi. I'm just a shadowy mysterious figure; Magi does an amazing dance art piece. Skinny Dip is always alot of fun!